I really underestimate myself sometimes. Since my injury, I’ve definitely slowed down on my baking. I was put off by the pain I have to deal with afterward. Using something that doesn’t work properly can do that.
Lately, though, I’ve been challenging myself to bake more. There’s something so comforting about homemade bread, and I’m starting to get back into it!Recently, my family and I went on a weekend getaway to Scotland to celebrate my mom’s 50th birthday. I decided I’d make all the bread we’d need for the trip. My family has always loved fresh bread, especially my dad and brothers, who would devour it as soon as my mom baked it when we were younger. So, knowing that there would be 9 of us on this trip, I knew I’d need to make a lot of bread to keep everyone happy!
I started by researching and narrowing it down to two recipes from one of my favorite bread-making instructors on YouTube, John Kirkwood. He always shares great baking tips, and his tutorials are so thorough—no fluff, just honest instructions! You can find him on YouTube under "John Kirkwood" or visit his website: www.profoodhomemade.com.
I chose his Soft Sandwich Rolls, which are perfect for everyday baking. They can also be easily modified into his decadent soft cheese rolls (I’ve added Red Leicester and cheddar before, and they were heavenly, though maybe a bit too rich for what we needed for the trip). But since I wanted something a little fancier for our getaway, I went with his
Crusty Bread Rolls—simple, easy, and oh-so-good! These rolls are perfect for those looking for easy bread recipes to try at home.These crusty bread rolls were definitely a hit during our weekend away. My favorite way to enjoy them was during lunch on our second day. We sat down family-style and ate stewed oxtails, white basmati rice, and this crusty bread. My mom, the true chef in our family—the lady with the apron and the spoon!—made the oxtails, and they were divine. My bread was the perfect complement. One of my brothers didn’t even bother with the rice, which, now that I think about it, makes me smile!
I was thrilled that everyone enjoyed the baked goods I bought. My suitcase was literally packed with treats! I made 40 crusty rolls, 10 sourdough rolls, one large sourdough loaf (which we had with lasagna on our second night), a large banana and chocolate chip cake, and a white chocolate and strawberry jam vanilla cake.
John’s recipe is perfect as is, but I do make one small modification: I add a bit more yeast. His recipe calls for 4g of yeast, but I use 6g. I feel like it enhances the flavor without throwing off the balance, and everyone loved the bread, so I think it works!
It was fun to see how everyone ate their bread—some with jam, some with melted cheese, and others just with butter. My personal favorite? Toasted with butter, cream cheese, a pinch of salt, and pepper. Delicious!
 |
| Recipe Card BACK (click to download!) |
If you decide to make this recipe, please share your thoughts, outcomes, or any modifications you make—I’d really love to hear from you! Let’s swap baking tips, favorite ways to enjoy homemade bread, or anything else you’d like to chat about. Don’t hesitate to leave a comment or reach out through the blog!
Turtledove
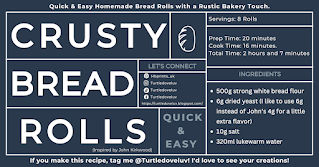
Crusty Bread Rolls Recipe (Inspired by John Kirkwood)
Ingredients:
500g strong white bread flour
6g dried yeast (I like to use 6g instead of John’s 4g for a little extra flavor)
10g salt
320ml lukewarm water
Instructions:
First, I activate the yeast by mixing it with a bit of the lukewarm water (about 50ml). Let it sit for 5-10 minutes until it's bubbly—this ensures it’s active and ready to go.
In the meantime, combine the flour and salt in a large mixing bowl.
Once the yeast is ready, pour it into the flour mixture along with the remaining lukewarm water. I use my stand mixer with a dough hook for this—it makes life so much easier! Start mixing on speed 2 for a minute to bring everything together, then lower to speed 1 and let it knead for about 10 minutes. During this time, I usually scrape down the dough from the hook at least twice to make sure it’s all getting worked properly.
When the dough is smooth and elastic, scrape it out of the bowl using a dough scraper and transfer it to a lightly oiled bowl. To help it rise, I like to pop it in my oven with just the light on. It creates a perfect warm environment! Let the dough rise for about 1 hour, or until it’s doubled in size.
Once the dough has risen, punch it down (don’t worry, it’ll rise again!) and divide it into 8 equal tight balls. Dust the pieces lightly with flour and let them rest for 5 minutes.
After the dough has rested, shape each ball into longer rolls. The shape I go for is a little like a small baguette—long and slightly oval-shaped. Place them on a buttered baking tray, dust them with flour again, and cover with a breathable kitchen towel or cloth.
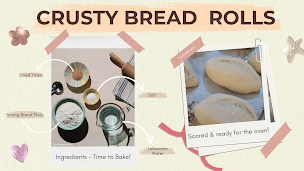
I like to use a baker’s scoring tool (or a sharp knife) to gently score the tops of the rolls, giving them that rustic, bakery-style baguette look.
Preheat your oven to 200°C (392°F). While the oven is preheating, I boil a kettle and place a tray of boiling water on the bottom rack of the oven to create steam. This helps give the rolls a beautiful crust while baking.
Once the rolls have risen, place them in the oven (carefully!) and bake for about 16 minutes, or until they’re as golden brown as you like.
When done, remove them from the oven and transfer the rolls to a wire rack to cool.
And there you go! Beautiful, crusty bread rolls with a soft, chewy interior. They’re perfect for sandwiches, or just slathered with butter. Enjoy!


No comments:
Post a Comment
Note: only a member of this blog may post a comment.